

Walk into any Woolworths on a Tuesday night and, without giving it a second of thought, you run a surprisingly complex machine in your head. You know where the bread is. You know the milk is up the back. You know the person behind the register can take your money, but cannot open the safe in the office. You understand the whole system intuitively, because you have lived inside it your whole life.
Hold onto that, because it is the single best map of how software works that I know, and it is going to carry you all the way from “I have no idea what any of this means” to your own app, live on the internet. Let us walk the store together.
The shopfront, the stockroom, and the locked back office
Step through the doors and the first thing that hits you is the shopfront. The lighting, the signage, the wide clean aisles, the pyramid of mangoes on special. Everything here is designed for you, the customer, to see and touch. In software, this is the front end. It is the screen, the buttons, the text, the sign-up box. If a person can look at it or click it, it is the front end.
Now look at the shelves. Every product, every price tag, every last count of how many tins of tomatoes are left, is information the store has to track perfectly. Get it wrong and the whole place falls apart: wrong prices, empty shelves, chaos. That careful record is the database. It is, quietly, the most valuable thing the business owns.
Then there is the bit customers never really see. The loading dock out the back. The manager's office. The cash room with the safe that only two people have the code to. This is where the money moves and the sensitive decisions get made. In software, this is the back end: the engine room that checks your password, takes your payment, and enforces the rules about who is allowed to do what. And every lock, every key, every alarm on those back doors is security.
A good store feels effortless because these three parts talk to each other without you ever noticing. You put a chocolate bar on the belt (front end), the scanner pulls its price (database), the terminal takes your tap (back end), and you walk out. You only feel the seams when something breaks: the item that will not scan, the card reader that is down, the shelf tag that disagrees with the till. Software is exactly the same. Learn to see those three rooms, and you can understand almost any app ever made.
Front end
The shopfrontEverything the user sees and touches: pages, buttons, text, the sign-up box.
Back end
The engine roomLogins, payments, and the sensitive logic and rules the customer never sees directly.
Database
The stockroomThe single, accurate record of your information: users, prices, orders, content.
Supabase
A ready-made database and login system, so you do not build the stockroom or the security desk from scratch.
Stripe
A ready-made payments system, so you can take money safely without ever touching raw card details.
And here is what genuinely changed in 2026: you no longer need to know how to build any of these rooms yourself. You just need to know they exist.
Why this is a skill worth having, at any age
For almost the entire history of computing, turning an idea into working software meant one of two things: spend years learning to code, or pay someone who already had. That wall has come down faster in the last eighteen months than in the previous twenty years. It is the same shift that now has AI writing the majority of the code inside the world's leading software companies.
The name people have landed on, half as a joke, is vibe coding. Coined in early 2025, it describes a completely different way of building: instead of typing code line by line, you describe what you want in plain language, and an AI writes and runs it for you. You stay in charge of what to build. The machine handles how.
Fair warning, though. It is properly absorbing. The investor Naval Ravikant summed up the feeling better than I can:
Vibe coding is more addictive than any video game ever made (if you know what you want to build).
Naval (@naval), April 2, 2026
This is not a toy, and it is not a gimmick. The same technology now sits at the centre of the biggest tech companies on earth. What it means for the rest of us is simple and a little thrilling: a 16-year-old with an idea for an app, or a 60-year-old who wants a booking system for their little business, can get something real working in an afternoon. The valuable skill is no longer memorising syntax. It is knowing what you want, describing it clearly, and understanding enough about the moving parts to check that the result is actually any good.
That last part, the checking, is where a little care comes in.
One honest thing before we start
The same ease that lets you build a login page in minutes lets you build an insecure one just as fast. The moment your project touches real people's accounts, details, or money, the locked-back-office part stops being optional. You do not need to become a security expert. You just need one habit: when real data or payments are involved, stop and ask the AI directly, “what are the security risks here, and have we handled them?” Knowing to ask that question puts you ahead of a frightening number of people already shipping software today.
Right. Here is the entire journey on one page, so you can see where we are headed before we take the first step.
You spend almost all your time on the very first step, in the chat. Everything after it, the tools handle for you.
What you'll use, and why it's free to start
We will build with Google Antigravity, Google's AI-powered building environment (an IDE, in the jargon). There are several good tools in this category, but Antigravity is a kind starting point: Google currently gives generous free access to its Gemini models inside it, so you can build without paying a cent, and it is gentle enough for a first-timer while still being powerful enough to grow into.
A quick note on names, because this world moves fast. Antigravity launched in late 2025, and Google released Antigravity 2.0 at its I/O conference in mid-2026, now running on its Gemini 3.5 Flash model by default. If the version numbers look a little different by the time you read this, do not worry. The workflow below does not change. You will also make a free GitHub account, and later, if your project grows, maybe one or two other free services. Nothing here costs anything to begin.
Create a GitHub account and your first repository
First, what is GitHub? Picture a safety-deposit box crossed with a filing cabinet, stored securely online. It keeps a master copy of everything you build, remembers every single change you have ever made (so you can rewind when something breaks), and lets you reach your work from anywhere. It is simply where software lives. Head to github.com, make a free account, and look for the green New button to create a repository.
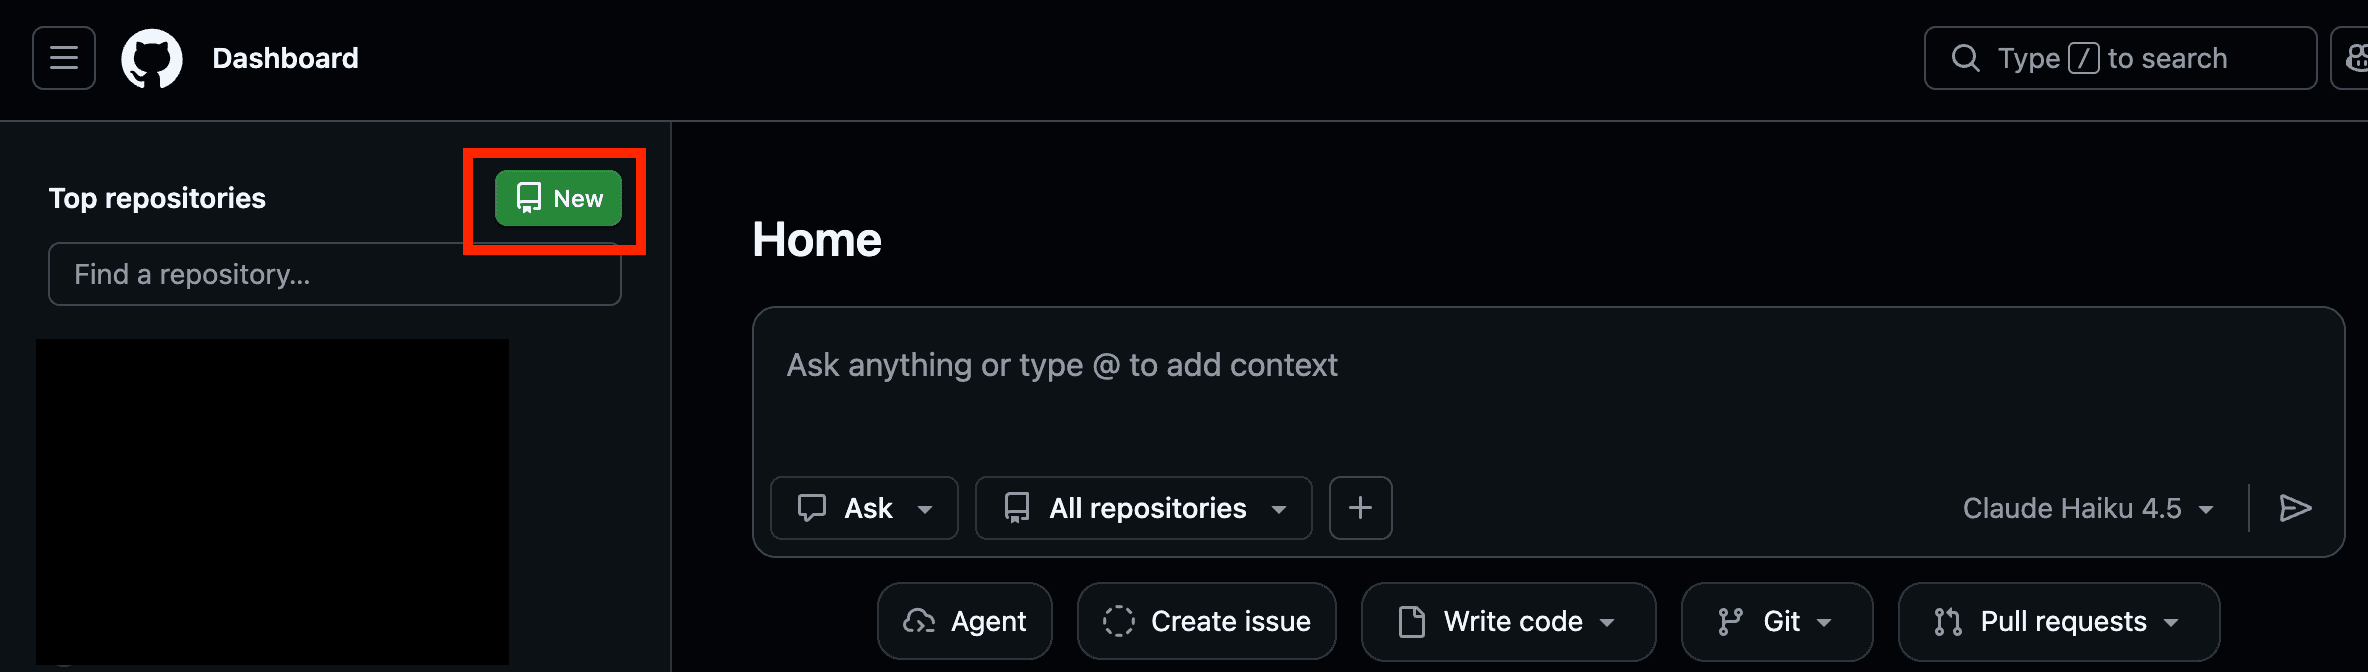
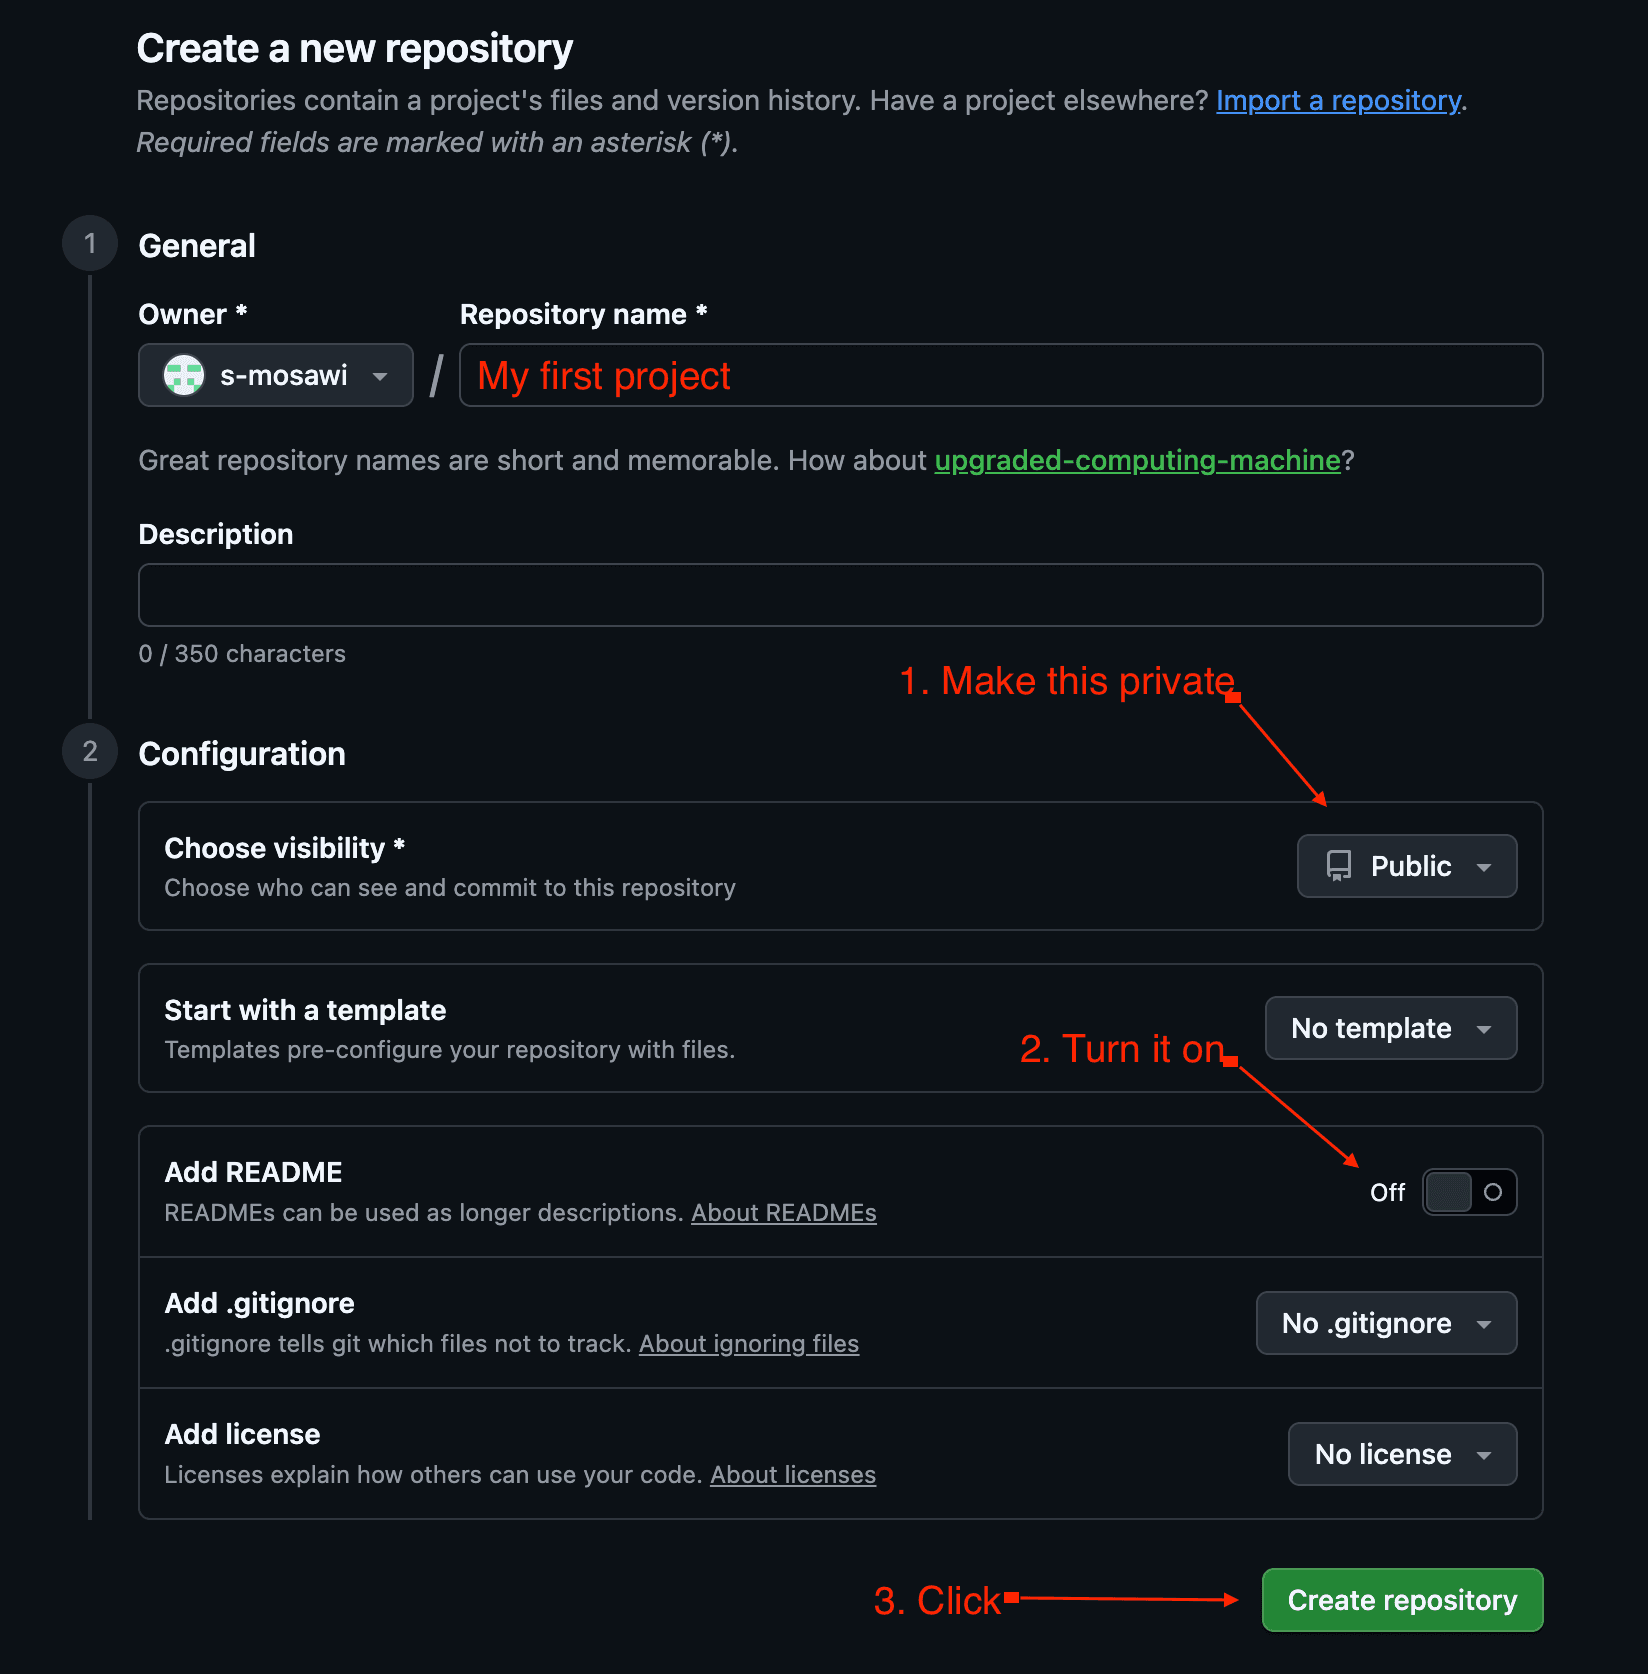
A repository, or “repo,” is just the dedicated folder that holds everything for one project. One project, one repo. When you set it up, three things matter: give it a simple lowercase name like my-first-app, set Visibility to Private so only you can see it, and tick Add a README file so the repo starts with something inside it rather than empty. A README is just a plain description of your project.
Local and remote: the bit most guides skip
This one idea will save you hours of confusion, so it is worth thirty seconds. Your project lives in two places at once. There is the remote copy, up on GitHub in the cloud, which is the master. And there is the local copy, in a folder on your own computer, which is the one you actually build and test on. The whole job of the tool you are about to install is to keep these two copies in sync. You build locally, then push your changes up to GitHub so the master stays current and safe.
Why keep a remote copy at all? Three reasons: it is a backup if your laptop dies, it is a complete history so you can undo mistakes, and it lets you work from anywhere. On your repo's GitHub page you will see a green Code button. Inside it is a web address ending in .git, and a tempting Download ZIP option.
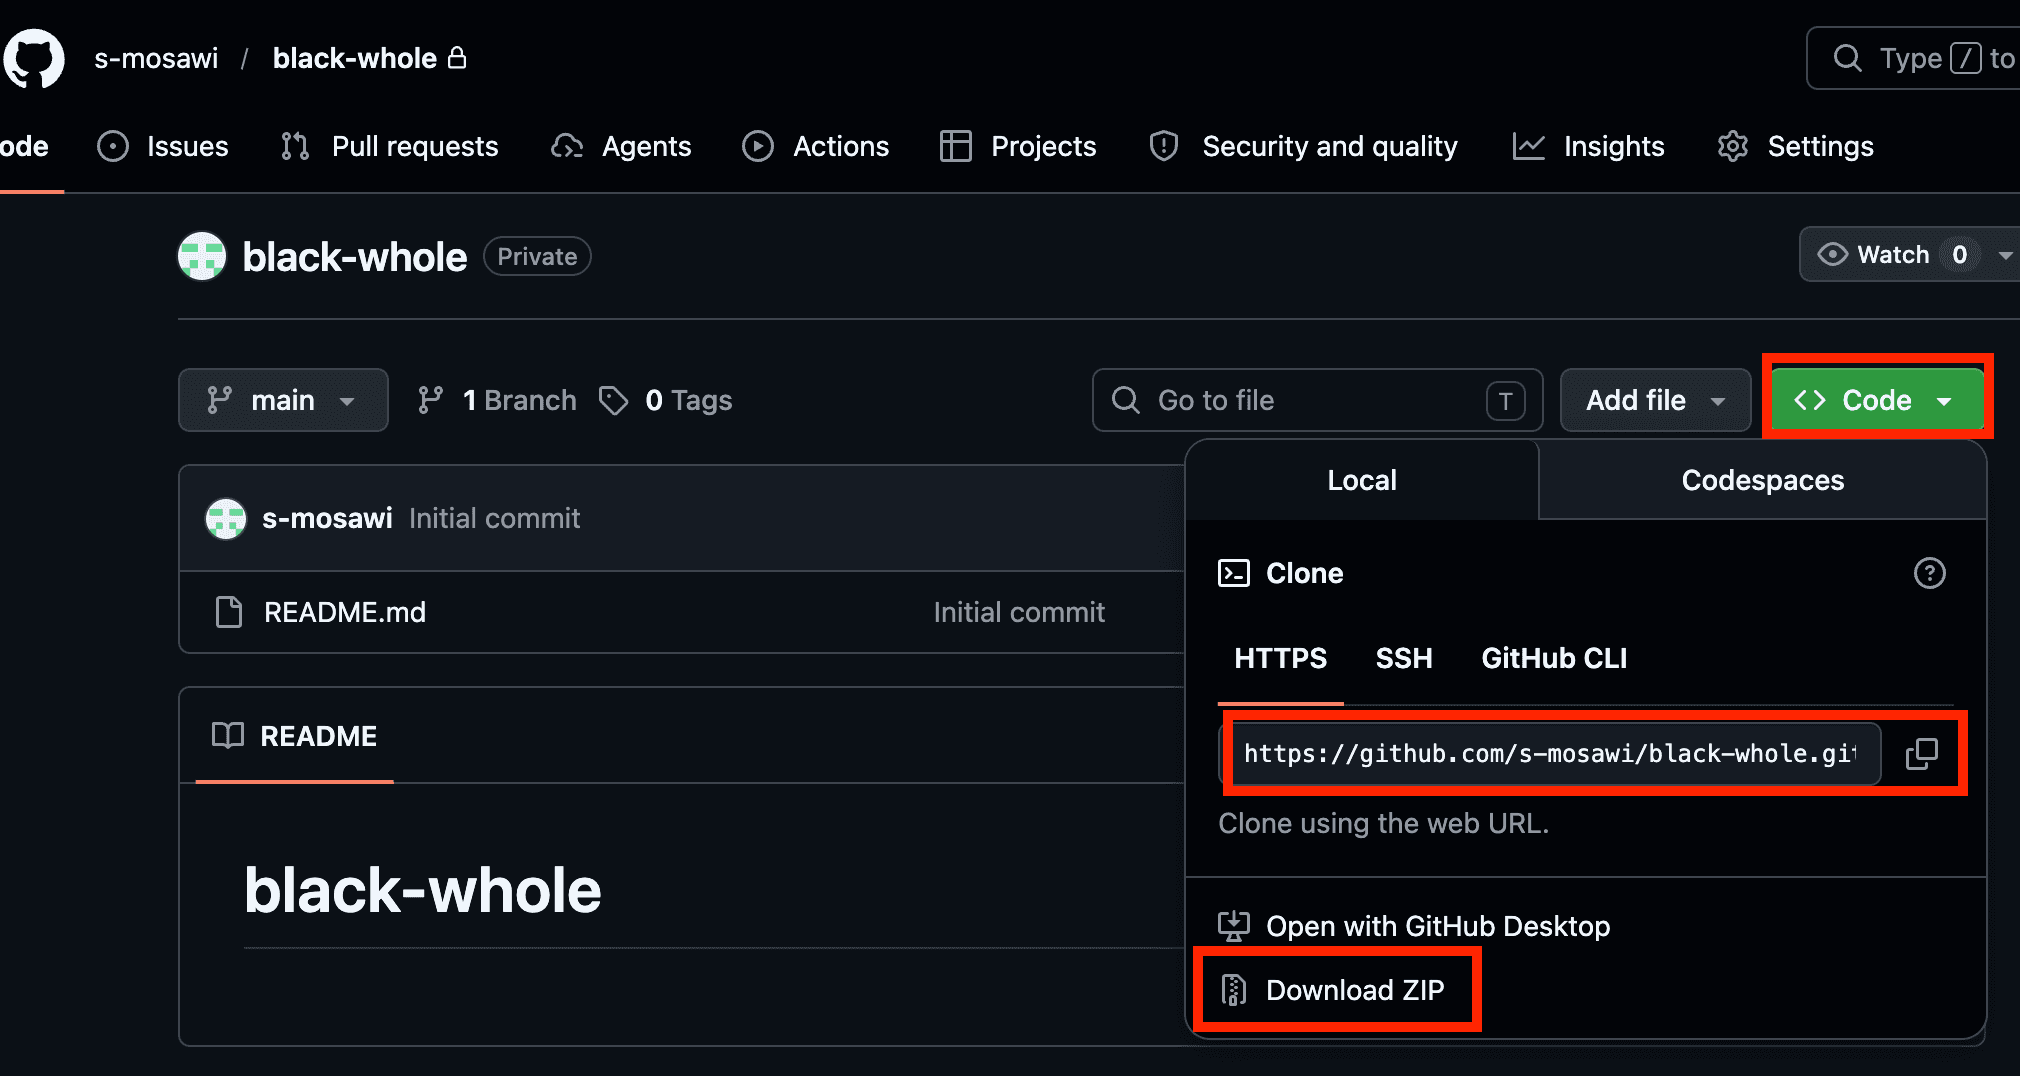
Resist the ZIP. A downloaded ZIP is a dead snapshot with no thread back to GitHub, so it can never stay in sync. You can see the problem in a single lonely file sitting in your Downloads, cut off from everything.

Instead, we will hand that .git link to Antigravity and let it make a proper, connected copy, which is called a clone. The result is an ordinary folder on your computer that happens to stay linked to GitHub.

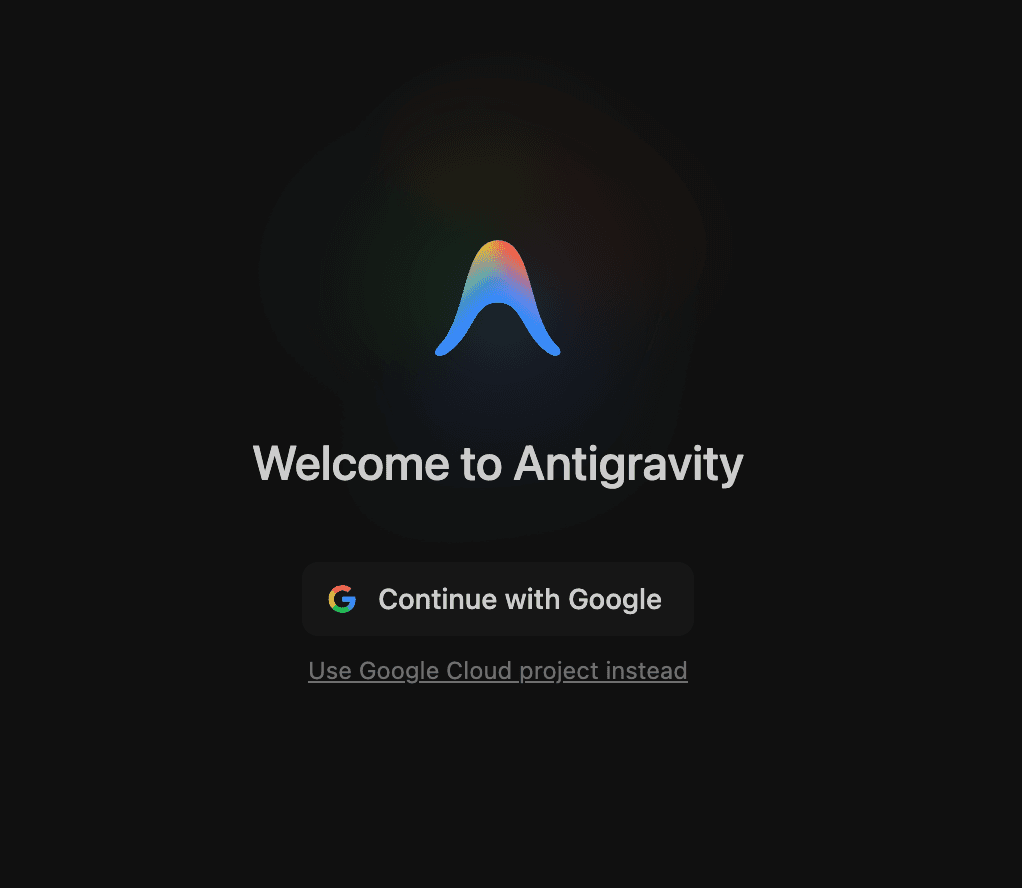
Download and install Antigravity
Go to antigravity.google and download the version for your computer. There are builds for Windows, Mac, and Linux. Run the installer like any other program, and the first time it opens, sign in with your Google account.
Open Antigravity and connect your project
Inside, you will find a chat box. If you have used ChatGPT or Gemini, this will feel instantly familiar: a place to type what you want in plain English. This is your AI chat, and it is where you will spend almost all of your time.

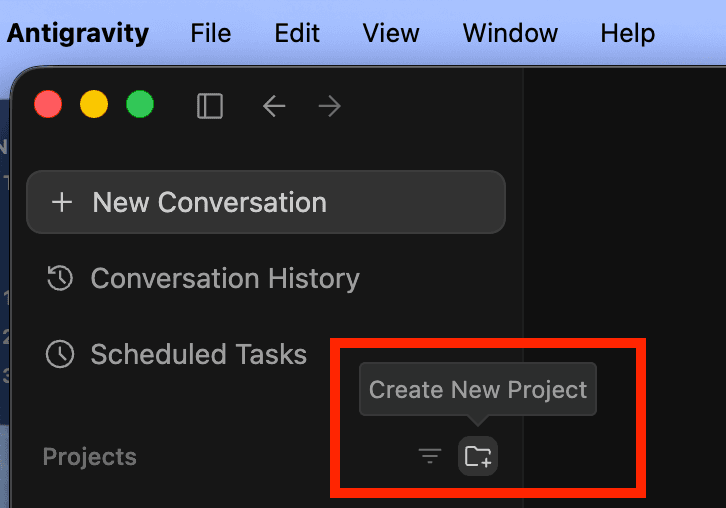
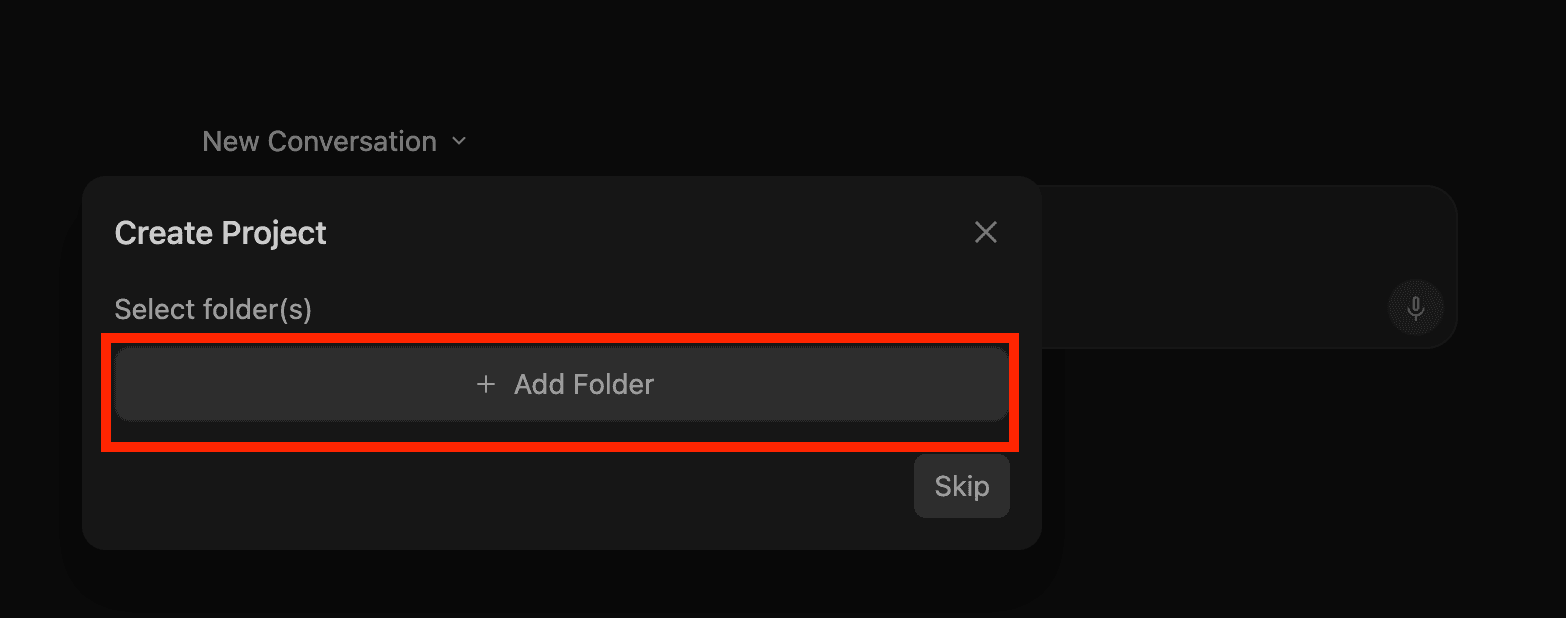
Start by creating a project. In the sidebar, beside Projects, click the Create New Project icon, then choose an empty folder on your computer for it to live in (somewhere easy to find, like a new folder on your Desktop).

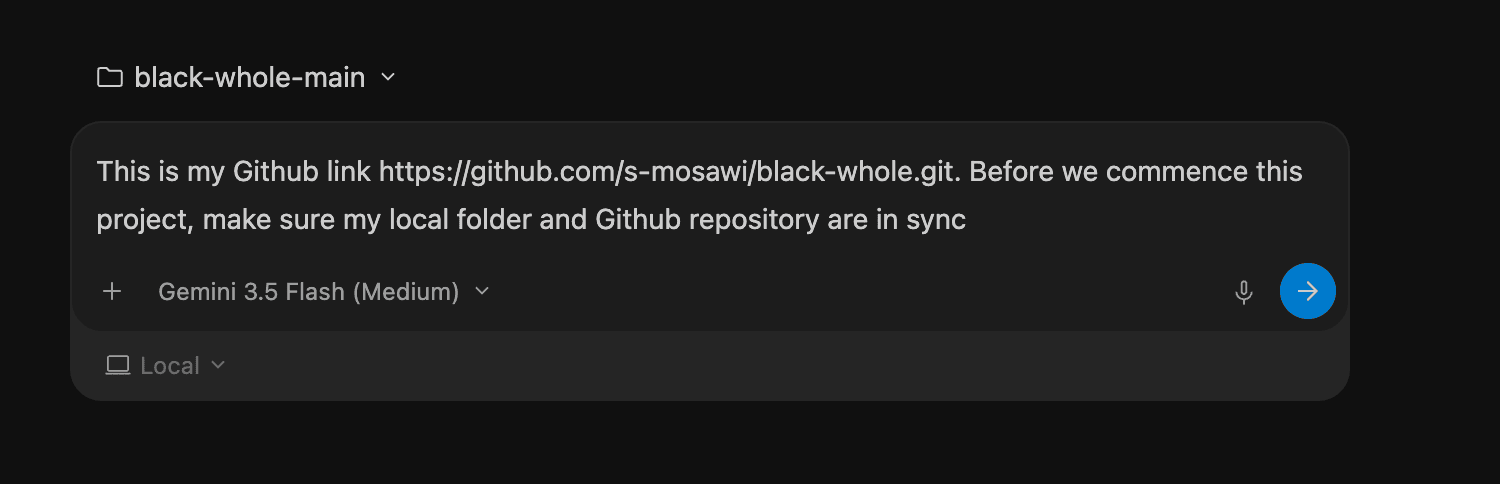
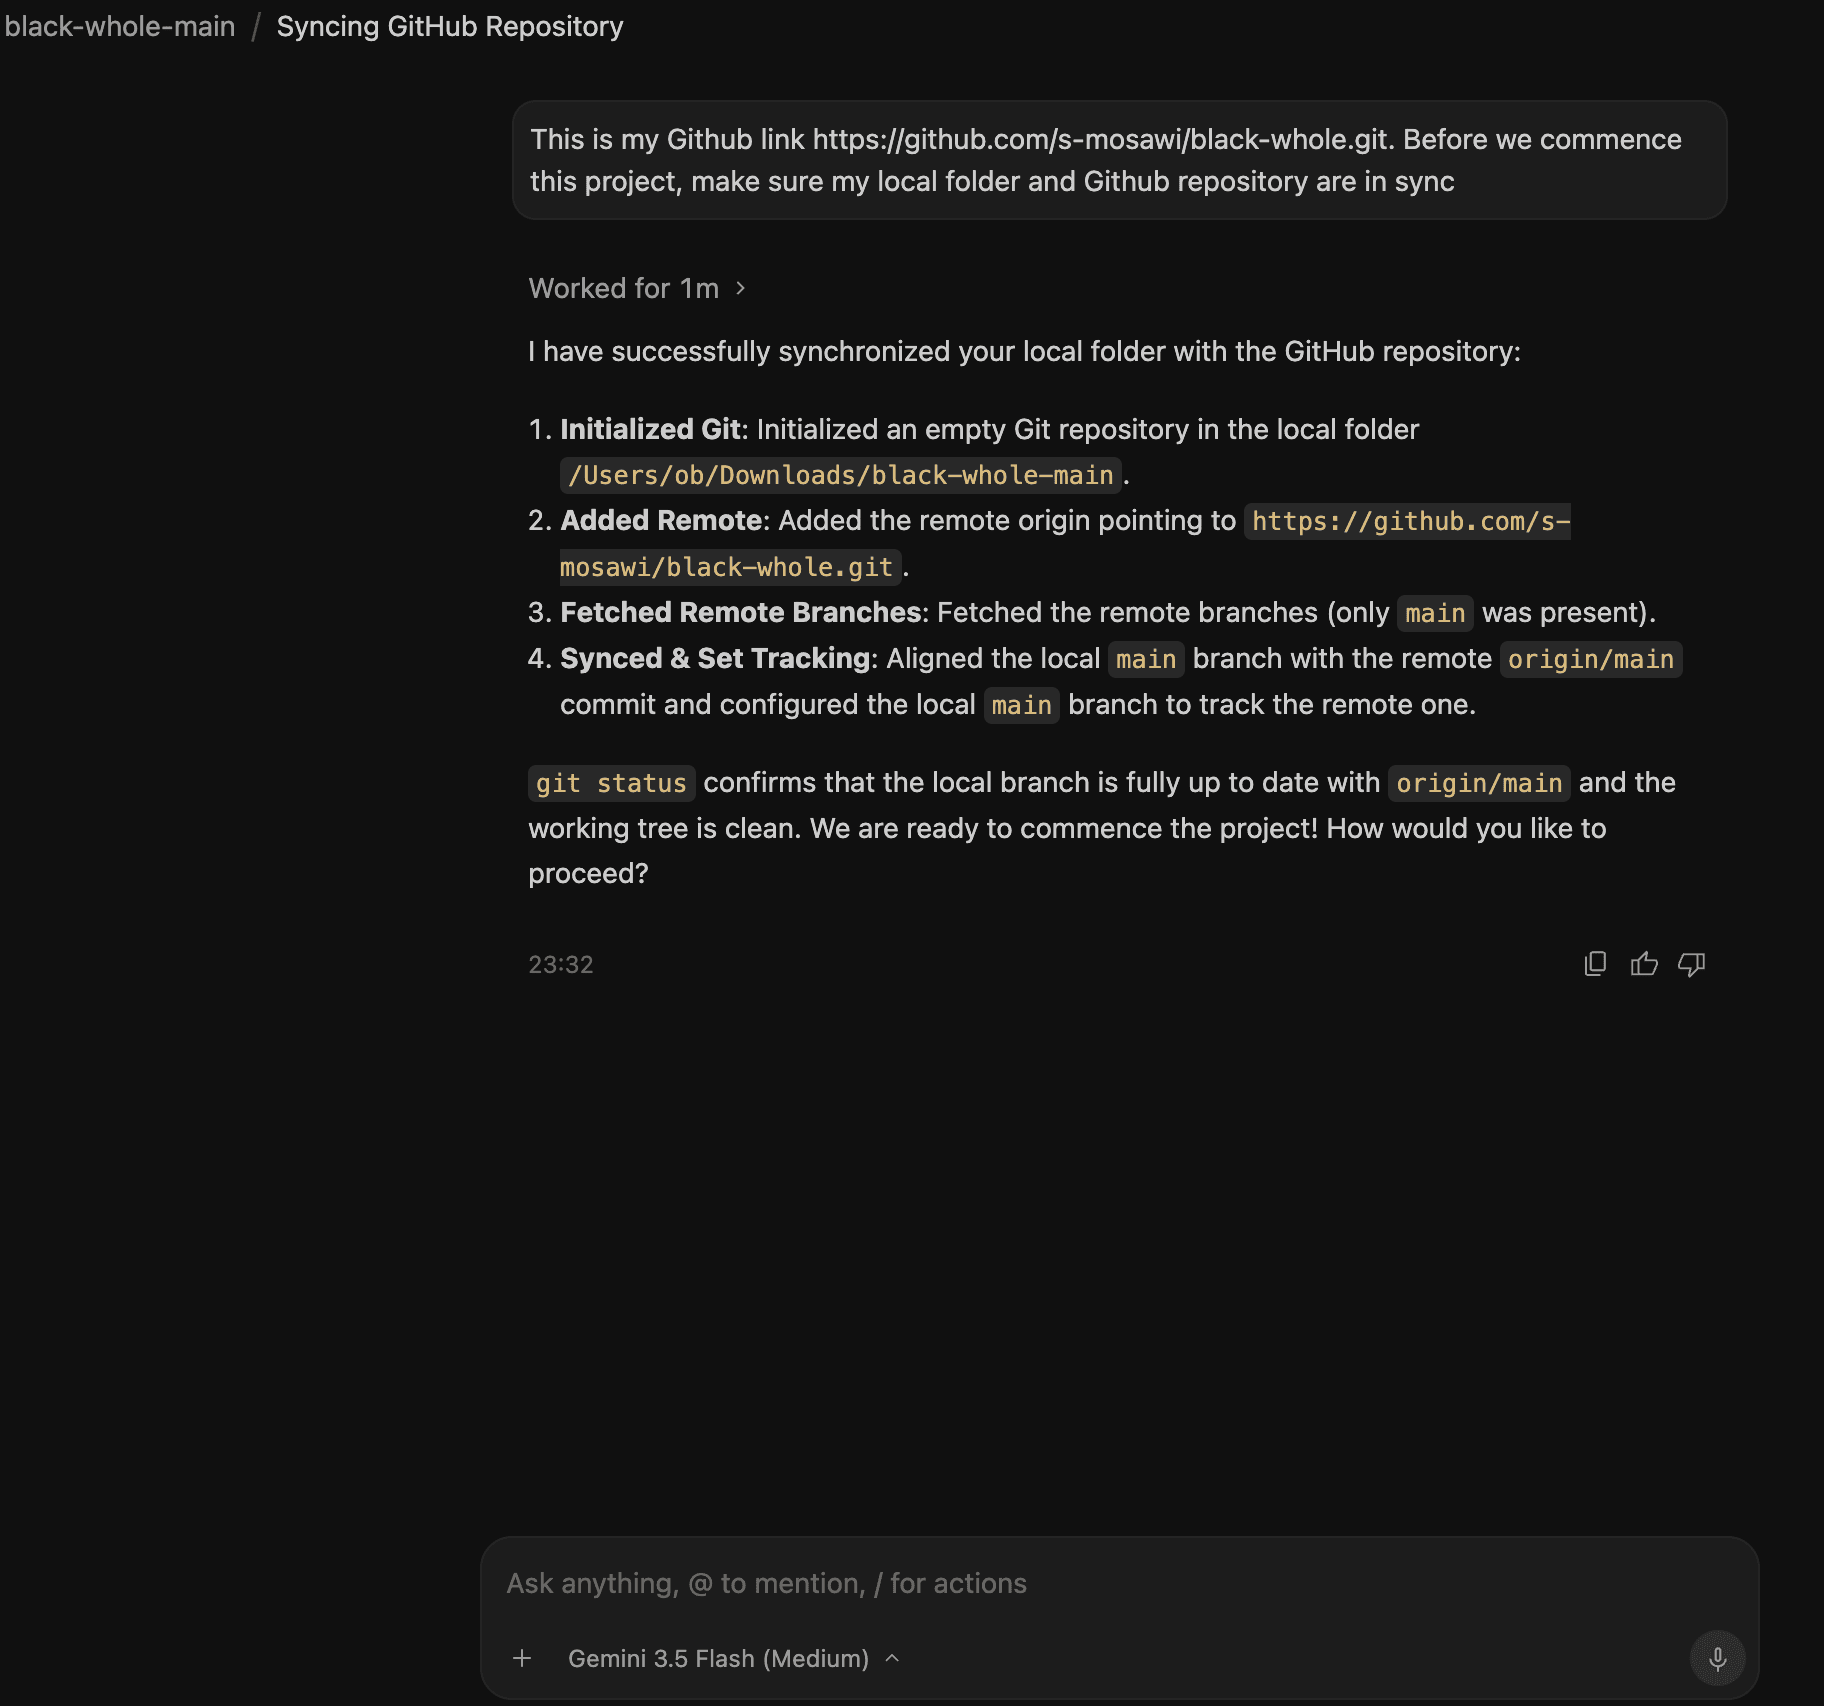
Now connect it to the GitHub repo you made. Paste your .git link into the chat and ask, in plain words, for the two copies to be wired together:
“This is my GitHub link: [paste your link]. Before we start, please connect this folder to my repository and make sure my local folder and GitHub are in sync. Then we'll begin building.”
Here is a detail I genuinely love. Before the AI runs anything that touches your computer, it stops and asks permission. That is the sandbox at work: a safety fence that means the agent cannot quietly run commands behind your back. When it wants to check the connection, it pauses and waits for your yes.
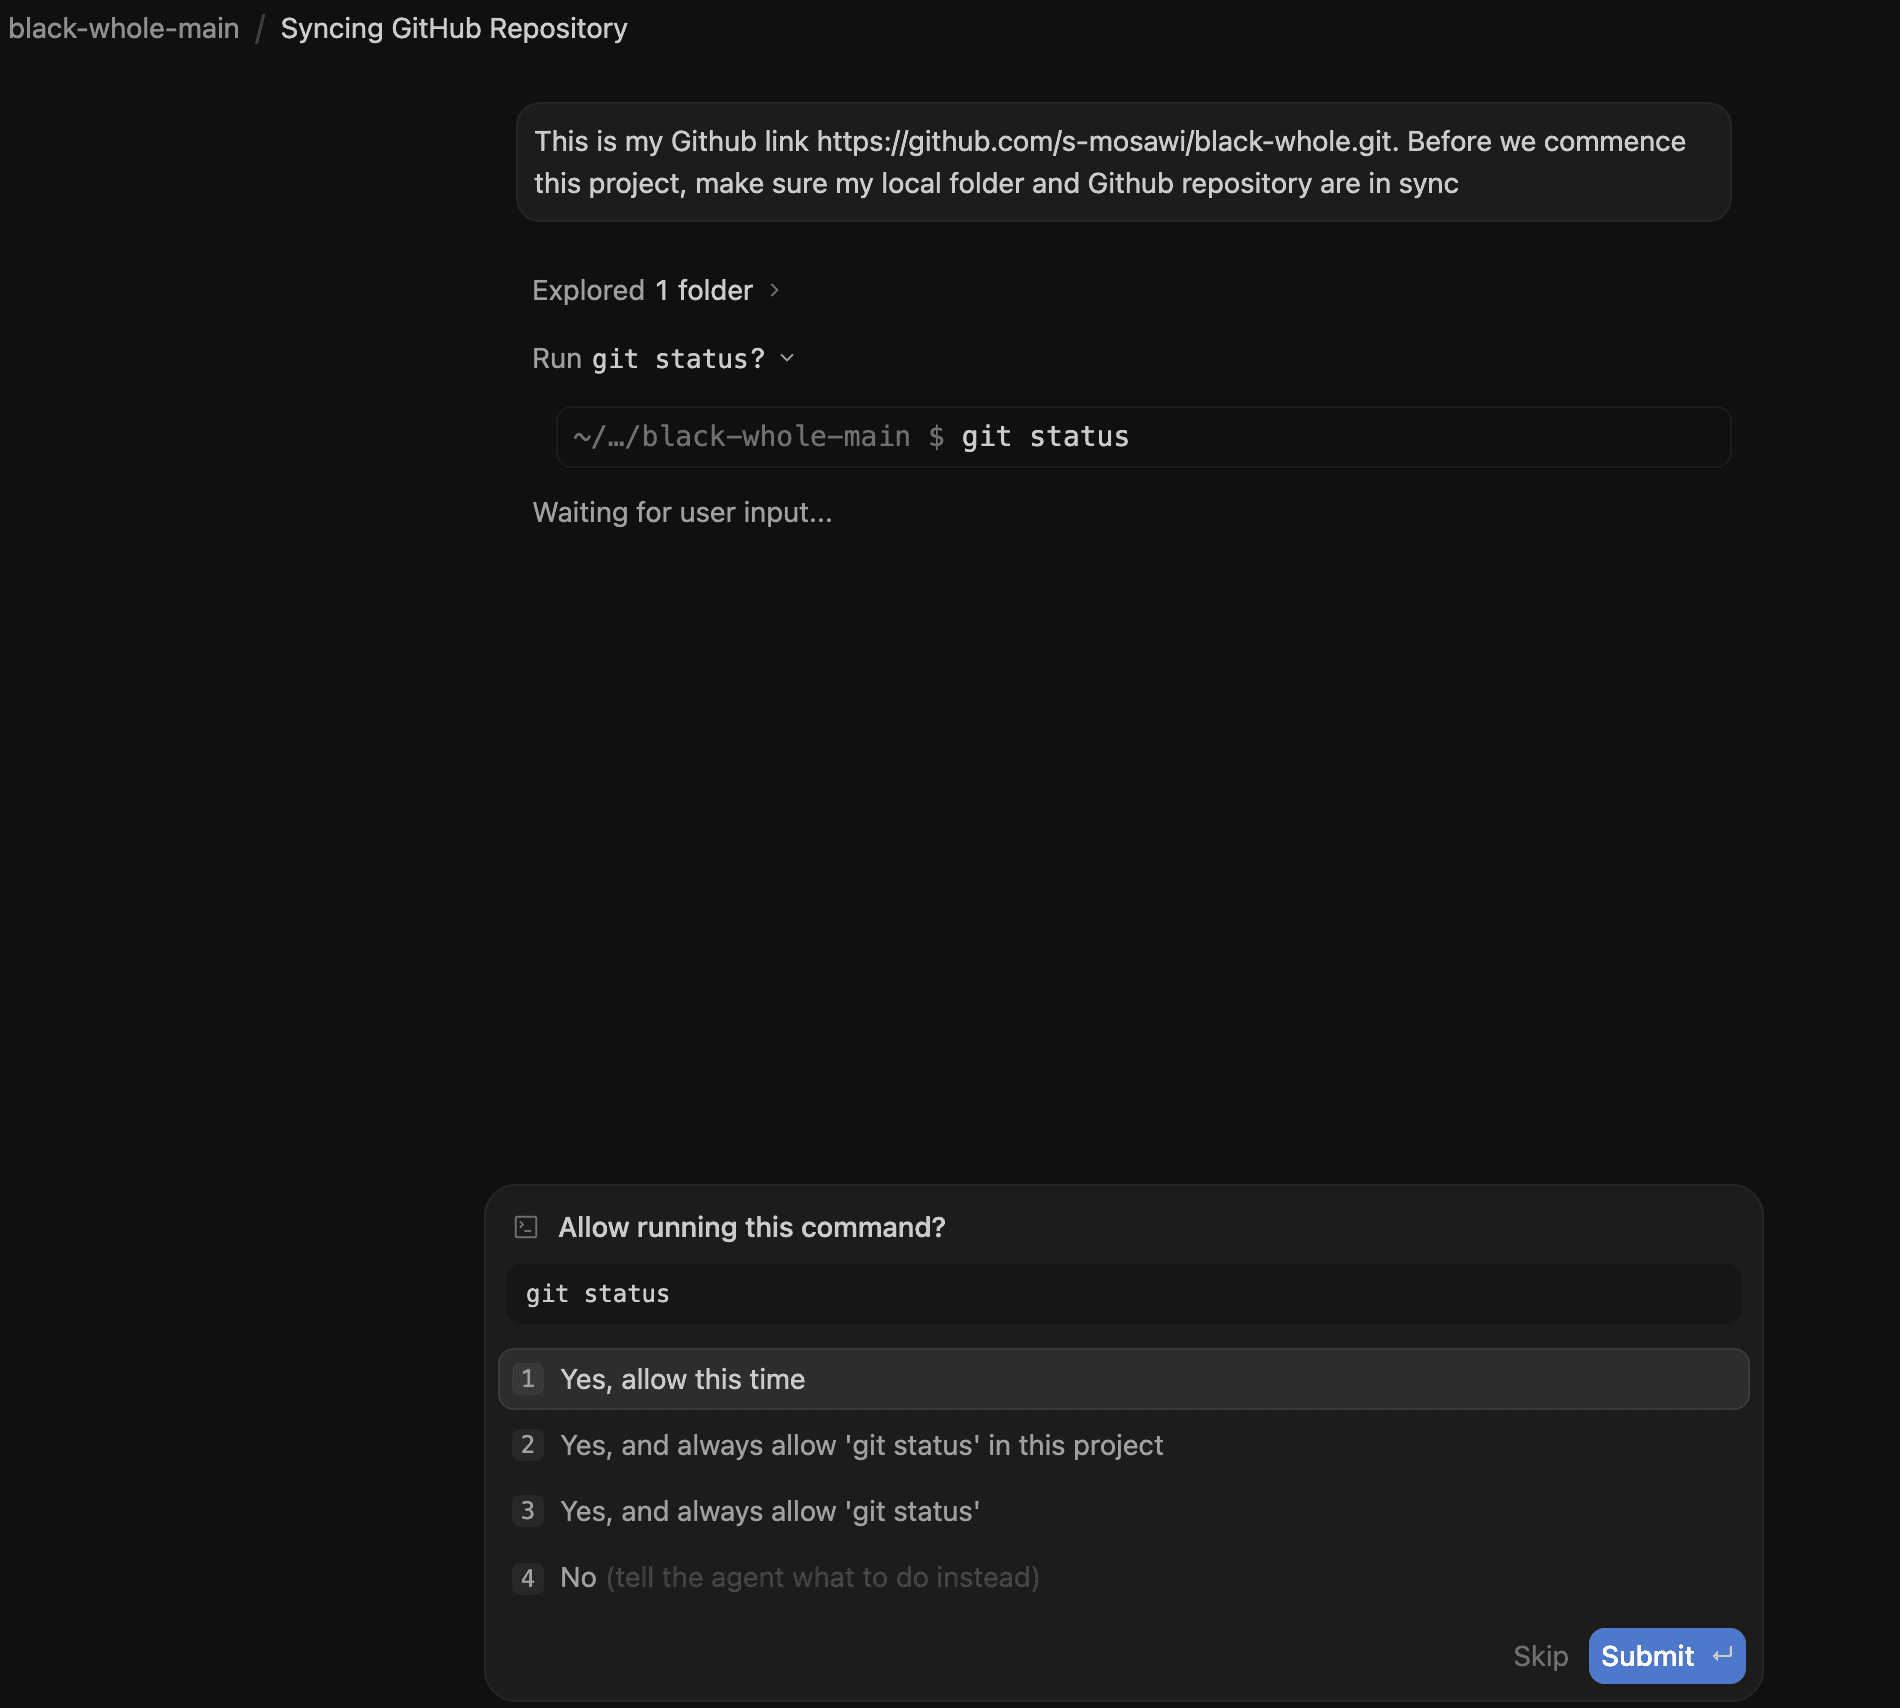
Moments later it confirms everything is connected: it set up git, pointed your folder at the GitHub repo (this link is the remote), and checked the two copies match. From here on, that folder is home, and it talks to GitHub.
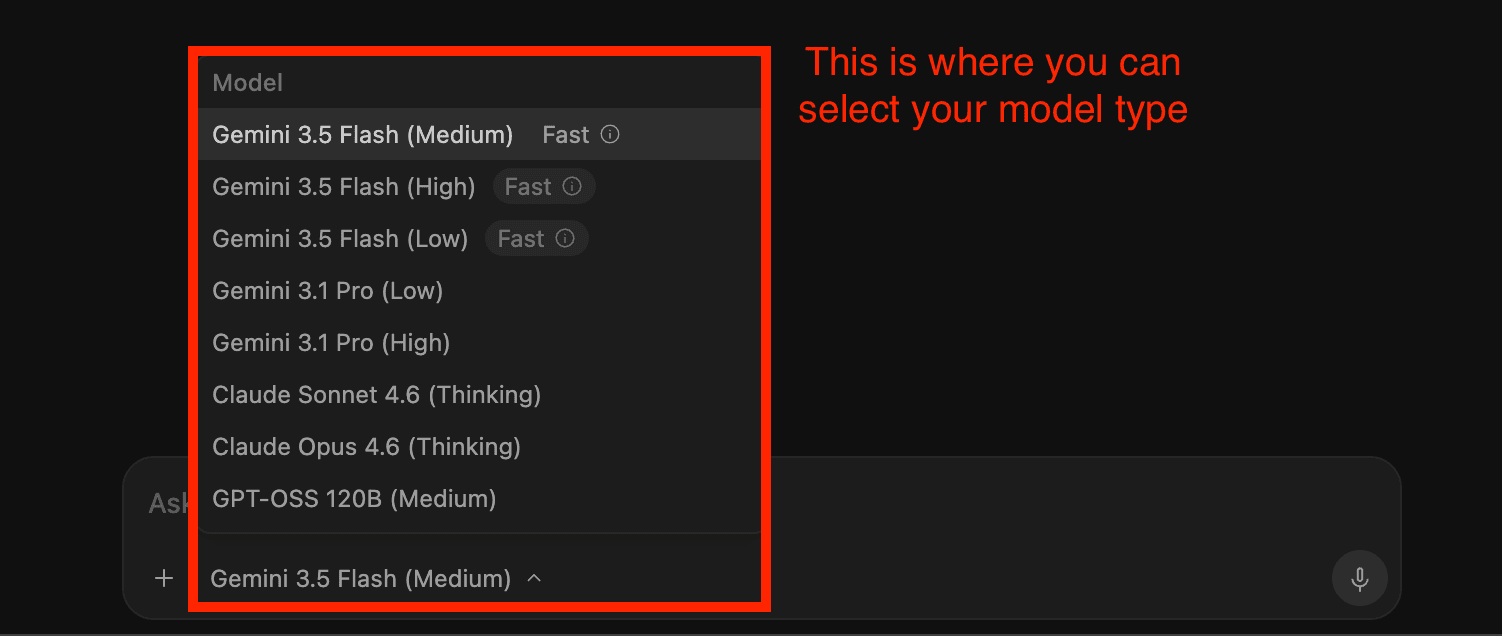
One last thing before we build. At the bottom of the chat is a model picker. You start on Gemini 3.5 Flash, which is fast, free, and perfect for learning. For a knottier problem you can switch to a stronger AI model (a heavier Gemini, or a Claude model) and switch back when you are done.
Build it, preview it, save it
Now the genuinely fun part. You describe what you want, in plain language. You could start tiny, and the steps would be identical:
“Build me a clean, modern landing page where people can sign up to a newsletter: a headline, a short description, and an email box.”
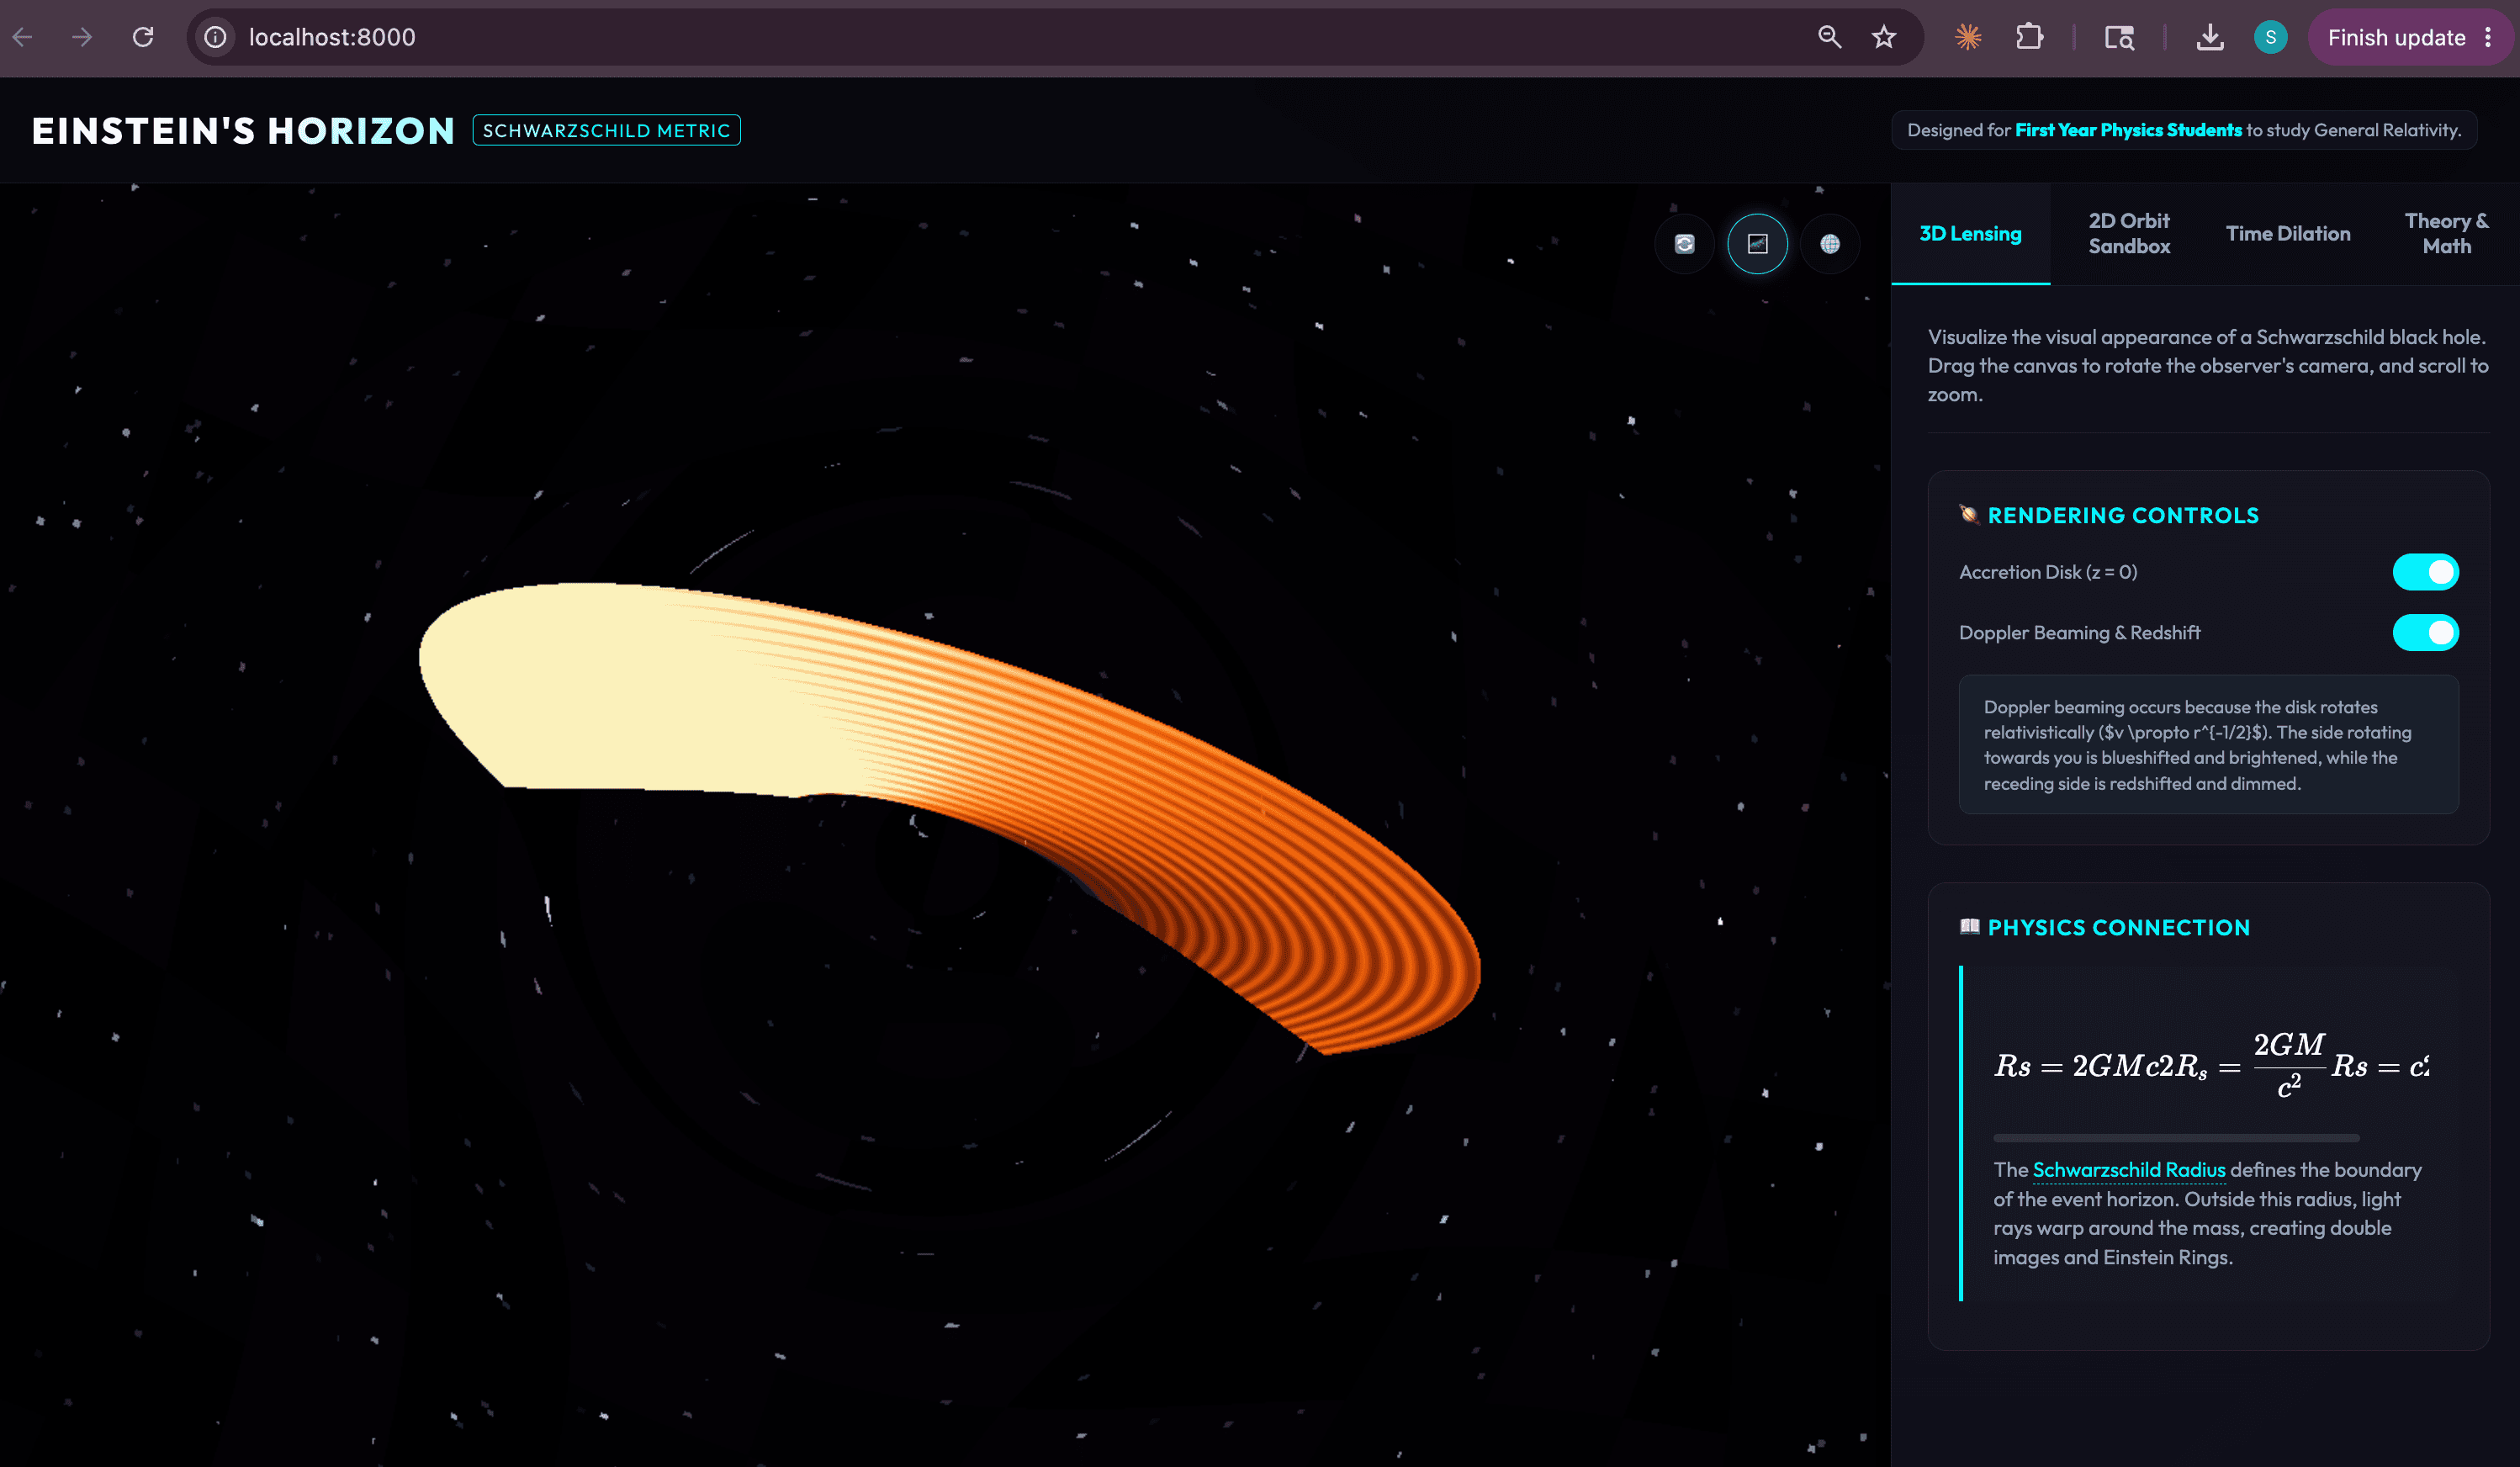
That is a perfectly good first project. But I want to show you the ceiling, not just the floor. So here is something I actually built one night, with nothing but a chat box: an interactive black hole simulation, with real physics underneath it. Same tool, same steps, just a braver ask. Watch it think first, laying out a plan before it writes a thing.
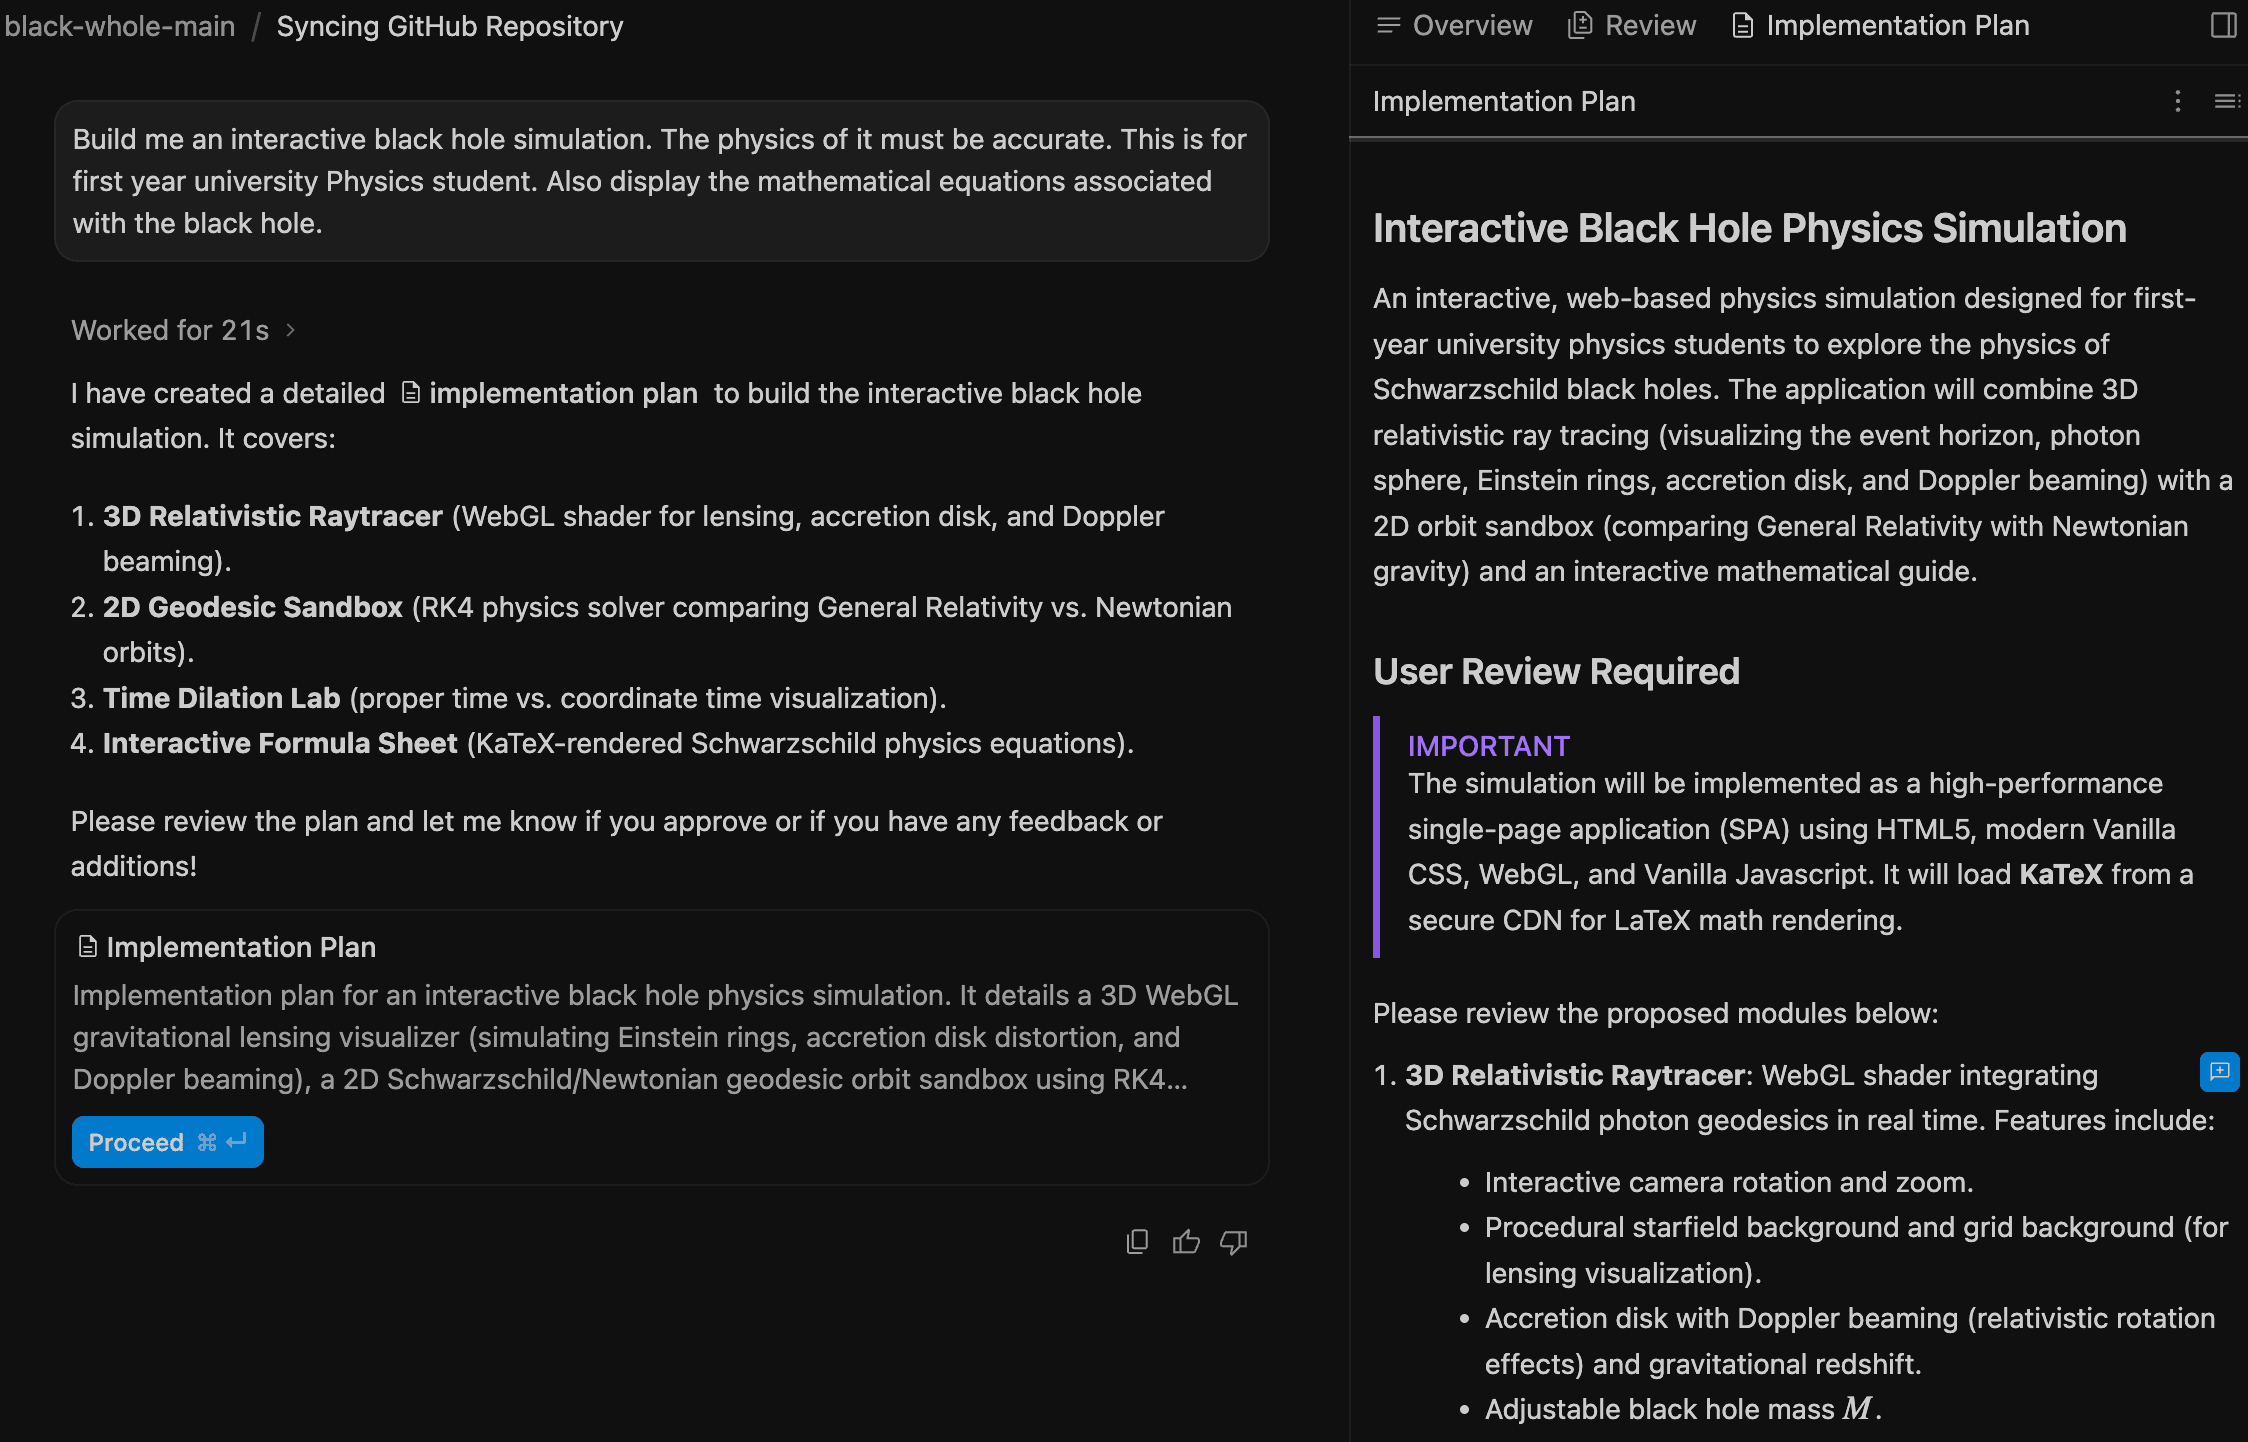
When it finishes, it hands you a localhost link, something like localhost:3000. Localhost is a private preview running only on your computer. Nobody else on the internet can reach it. It is your rehearsal space: change something, refresh, see the result instantly.
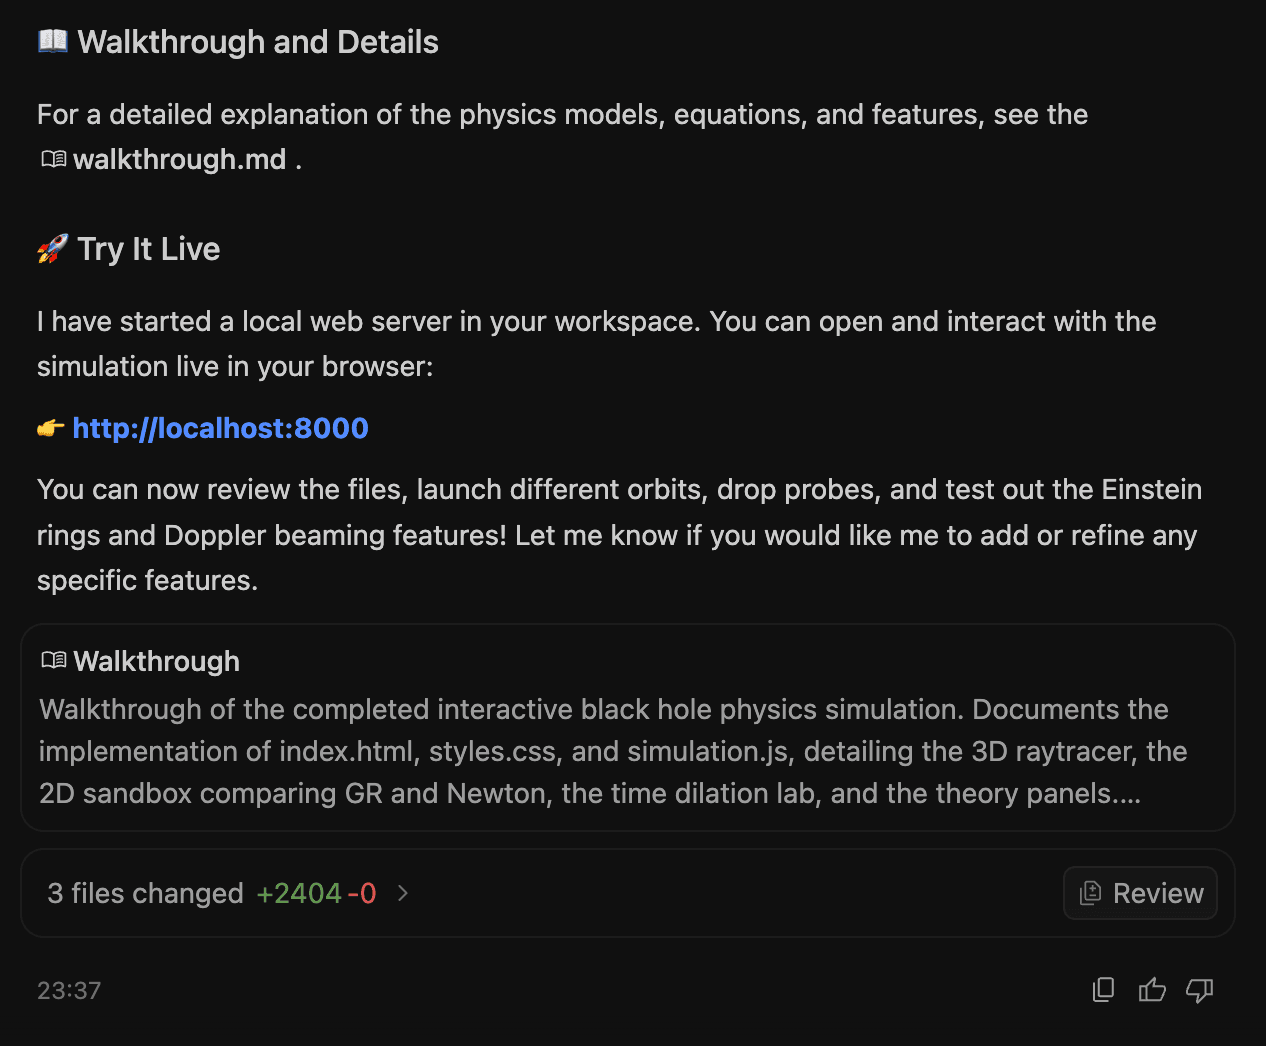
And here it is, alive in the browser. A real, interactive simulation, conjured out of a few plain-English sentences.
Once you are happy with a change, you save it properly. This is two steps, and people forever muddle them, so here is the clean version. A commit saves a labelled snapshot to your local copy, like taking a dated photo of your project. A push then uploads those snapshots up to GitHub. The commit is the photo; the push is posting a copy to the safe-deposit box. In practice you just say: “Commit these changes with a message describing what we did, then push them to GitHub.” Build the habit of doing it every time something works, so you always have a safe version to fall back to. (The reverse move, pulling, brings changes down from GitHub, which matters once you work across two computers.)
Stuck? Ask the AI. That is the whole point.
This is the habit that changes everything for a beginner. When something breaks, when a word in this guide makes no sense, or when you simply do not know what to do next, type it into the chat in plain English. Paste the error message. Ask “what does this mean?” or “why isn't this working?” or “what are my options?” The AI that builds your project is also the most patient teacher you will ever have for it, awake at any hour. You are not expected to already know. You are expected to ask.
When your project needs a back end and a database
A simple landing page is almost all front end. But the moment you want people to create accounts, log in, or pay for something, you have walked through to the back of the store, and you will need a couple more services. The friendliest place to start is Supabase.
Supabase hands you a ready-made database and a ready-made login system (developers call that authentication, or “auth”) without you building either from scratch. It is the stockroom and the security desk, available to plug straight in. The free tier is generous: a real database and up to 50,000 monthly users, though free projects pause after a week of inactivity and switch straight back on from the dashboard when you return. You make a free account, tell Antigravity you want to connect it, and the AI walks you through the wiring.
Part of that wiring involves API keys, which are like passwords that let your app and Supabase talk to each other. Antigravity tucks these into a hidden file called .env.local. The golden rule, which good tools follow on your behalf, is that this file of secrets must never be pushed to GitHub. Leaking your keys is the digital version of taping the safe's combination to the front window.
The one question that prevents a real disaster
When you set up a database that holds user information, ask the AI directly: “Have you enabled row-level security so each user can only see their own data?” That single sentence prevents one of the most common and serious beginner mistakes: building a database where any user can quietly read everyone else's information.
Go live with Vercel
When your project is ready for the world, you deploy it: you put it on the public internet with a real address instead of your private localhost preview. A free, beginner-friendly way to do this is Vercel. You make a free account, connect it to your GitHub repo, and Vercel publishes your site, then re-publishes it automatically every time you push a change. (Notice how that GitHub habit from Step 5 keeps paying off.) Own a domain like mygreatidea.com.au? Add it in Vercel's settings and your site appears at your own address.
A safety net you can plug in
Everything so far makes building easy. Building responsibly is a slightly different skill, and it is the one most beginner guides skip entirely. To make it easier, we maintain a free, open resource called the Australian Responsible Vibe Coding Standard (ARVCS).
Think of it as a rulebook you hand to your AI. It is a GitHub template full of plain-language guardrails: rules for the agent to follow, safe-prompting guidance, a simple risk checklist, and protections that stop secrets and trade information from leaking out. It is written to line up with the Australian Privacy Principles and National AI Centre guidance, so the habits you pick up are the right ones from day one. Using it is beginner-proof: click Use this template to start a project with the guardrails already built in, or just point your AI at it and say, “follow the rules in this standard as we build.”
The bigger picture
A decade ago, the journey in this article would have meant months of study or thousands of dollars. Today a motivated person with a clear idea can go from “I wish this existed” to “here it is, live on the internet” in a weekend. That is a genuinely democratising shift in who gets to build.

That black hole simulation was not built by a team of engineers. It was built right here, on a laptop, well after midnight, by describing what I wanted and letting the AI do the typing. That is the part that still quietly amazes me. The barrier to making something real is now, mostly, just deciding to begin.
But the Woolworths analogy holds right to the end. You do not trust a good store only because the shelves are full and the doors slide open. You trust it because someone made sure the safe is locked, the customer data is safe, and the whole place is run with care. As building software becomes something anyone can do, doing it responsibly, with real thought for security, privacy, and the people whose data you hold, stops being a specialist's job and becomes part of the basic skill.
The tools have made it easy to create. The responsibility for creating well still belongs to you.
Every key word, in plain English
Every term linked with a dotted underline above is defined here, alongside the rest of the vocabulary you will meet on your first few projects. Search it, or just browse.
